|
|
 06-05-2011, 05:33 PM
|
#1 |
|
Senior Member

Join Date: Aug 2008
Location: Nineveh, Indiana
Posts: 512
Likes: 0
Liked 3 Times in 3 Posts
|
I acquired an "010" block from a local circle track racer that had quit. The block hasn't been bored or worked on, other than the main caps are missing. My question, what's the policy on replacement main caps in stock, both NHRA and IHRA? As long as it's the same material, weight, appearence as OEM. Is there anything I need to look out for.
__________________
Robert Swartz - Swartz & Lane 66 Chevy II Pro 95 Achieva EF/SA, 78 Mustang II U/SA (work in progress) #354 stock |

|

|
|
06-05-2011, 06:46 PM
|
#2 | |
|
VIP Member

Join Date: Jul 2007
Location: Anthem, Arizona
Posts: 2,766
Likes: 0
Liked 3 Times in 3 Posts
|
Quote:
__________________
Jeff Lee 7494 D/S '70 AMX |
|
|
|
|
|
06-06-2011, 04:33 AM
|
#3 | |
|
Member
Join Date: Oct 2008
Posts: 168
Likes: 0
Liked 1 Time in 1 Post
|
Quote:
You have a couple options,,, Option 1) Purchase the 3 center main caps and find a front and rear cap off another block, they came from the Factory with Nodular "2482" caps (see link below) Remember, it will need to be line bore and honed. My opinion is, if the caps are not Nodular, run ARP Bolts or Milodon Main Studs. If the caps are Nodular, You can run ARP Main Studs or anything else you wish to. Here is the link for the "2482" Nodular caps that came on many 010/020 4 bolt main blocks http://www.gmpartsdirect.com/perform...CATID=660.html Option 2) Order Milodon 11160 cap kit. This comes with three Ductile caps with much THICKER cross sections than Factory caps. This kit uses a 350 4 bolt register width with 3/8" angled outer main bolts. This kit comes with the outer splayed bolts with washers and the 7/16" main bolts with washers. The 7/16" main bolts even have a good amount of additional thread engagement than stock main bolts. If you wish to use studs, use Milodon part number 81128, this stud kit is for their caps only as their caps have much thicker cross sections. Then I would also use the Milodon 2 bolt front cap, part number 11153. I will link them on Jeg's so you get an idea what they cost. Milodon 11160 cap kit, $229.99 http://www.jegs.com/i/Milodon/697/11160/10002/-1 Milodon 81128 stud kit, $66.99 http://www.jegs.com/i/Milodon/697/81128/10002/-1 Milodon 11153 front cap, $81.99 http://www.jegs.com/i/Milodon/697/11153/10002/-1 Here are some of my suggestions if using this for a race block. 1) Get the block checked and sonic test cylinder walls 2) Clean/Tank block 3) Install main caps, get the caps on and torqued, line bored but do not do final line hone yet 4) Fill the water jackets with Hardblok before being bored and with main caps torqued (after line bore but before line hone). If any of the outer splayed bolts "Broke Through" in too the water jacket, remove them and dip the end of it in wheel bearing grease and install before putting Hardblok in. This will stop Hardblok from sticking to the end of the bolt for easy removal 5) After doing both sides with Hardblok, now its time to have the engine line honed. The reason it should be done here, is because the Hardblok makes the bottom shift a little and your main line will be PERFECT if line honed after the Hardblok is set up. 6) Now go on too boring and honing the engine to the desired specs Here are some mods I would do if I were you,,, 1) on the center 3 mains, drill the oil hole from the cam bearing to the main saddle to 5/16" for increased oil flow. 2) drill a .063" to .125" hole (depending how much oil you want here) at about 11:45 clocking, through the thrust face of the block so it runs into the annular groove under the front cam bearing 3) take an old oil pump and cut the neck off, bolt it to the rear cap, look through it, you will see the rear cap needs additional porting in most cases so all your oil from the oil pump can go into the passage, I have seen this 50% blocked from tolerances. Don't go too far or you will create a large oil leak which will lower pressure and volume of oil 4) i use dura bond cam bearings, which are coated by Calico. Depending on how much oil I want, I will drill the oil holes out to be 1-3 steps larger. I also clock them with 1 oil hole around 2:00 to 4:00 and the other around 9:00 to 12:00 so spring pressure and RPM will not cut off oil flow. 5) i open both rear drain backs no smaller than 1/2", The drivers side i open up much larger. Then I install the heads with gaskets and port through the oil return holes in the heads going to the block for rapid oil return 6) you have to take your main bearings and install them after you clearances are correct, then remove the caps and using a small carbide bit, grind the oil hole in the center 3 main bearings to be perfect to the main feed hole, also match the front and rear main bearings too as these are usually off also 7) take your main bearings out to modify after marking which one is which, now you want to narrow the main bearings. this will cut down on friction more than most would think. If you want, you can do this with the rod bearings too 8) I don't do machine work (I do mods to parts, but no boring etc etc), I always use my hones to put a finish on the cylinders that I have used to go faster when I tested it. Here is what I do,,, After the machine shop hones my block for desired PW clearance, I wash the block out and take a flex hone (320 grit) and hone the cylinders really good. The key here is to have the cordless drill on high before it goes in the cylinder, this allows the end of the beads to wear and not the sides, which also gives you a better finish Use the 320 grit hone, flooding the cylinder with WD40 then do 6 quick fast strokes. Do this to all cylinders. Then use a Plateau Brush for 3 slow strokes flooding the cylinder with WD40 then do 12 quick strokes. Link below has a picture of the brush we use http://www.cylinderheadsupply.com/44plbr.html Using this method, your torque to turn over the rotating assembly is minimal and it seals up very well. 9) take an old chimney cleaning brush (stainless steel) and polish the rifle line, fits in there perfect. assume you could use a flex hone but i know this works great for us 10) if your using say a 1/16" ring pack or 5/64" ring pack and a .040" quench, you can get better sealing by running the piston .025" out of the hole and using a .065" gasket. This still leaves you with a .040" quench but there is now the piston sticking out of the bore helping to guide cylinder pressure to the rings lateral gas ports in the spacers, rings, or pistons. Have seen 400 engines with 0 deck and .040" quench run good, but with .065" gasket and .025" out of the hole they run even better Hope this helps |
|
|
|
|
|
06-06-2011, 02:55 PM
|
#4 |
|
VIP Member

Join Date: Oct 2008
Location: Somerset,Ky
Posts: 1,380
Likes: 368
Liked 317 Times in 108 Posts
|
Down here in Ky. our hillbilly air isn't real smart it thinks .040 quench is .040 it can't tell how you come up with the .040 quench area,since our hillbilly air isn't real smart I take a sharpie and draw a map on top of piston, so it knows where to go.LOL
Mike Taylor3601 |
|
|
|
|
06-07-2011, 05:46 PM
|
#5 | |
|
Member
Join Date: Oct 2008
Posts: 168
Likes: 0
Liked 1 Time in 1 Post
|
Quote:
I have seen gains, mostly on 400 blocks that are being pushed with standard rings. Just like gas ports are a more effective way of guiding the pressure to the back of the ring. I have seen gains on 400 engines with the piston out of the hole, while still remaining the same quench it did before (although less compression the second way as all the quench is the larger gasket bore) I won't go have .050" decked off a block to do it, but for a 327 for example with a 6" stroke and 1.385" CH, it will put the piston out some at 9" deck, which is fine for me Do you agree he shouldn't or should pay this close attention? I think he should.... PS: There is hillbilly air here LOL Last edited by trmnatr; 06-07-2011 at 05:49 PM. |
|
|
|
|
|
06-07-2011, 06:03 PM
|
#6 |
|
Senior Member
Join Date: Aug 2008
Location: Nineveh, Indiana
Posts: 512
Likes: 0
Liked 3 Times in 3 Posts
|
Thanks guys. You answered my question, in spades. There's a lot of very good information there.
Yes, it is an 010 block with the 020 on the inside of the timing cover. It is a 4 bolt main block. I believe, I'm going to put this block back and save it for a bit. I'm now armed with some good information and have an idea of what it will take to make this an acceptable part.
__________________
Robert Swartz - Swartz & Lane 66 Chevy II Pro 95 Achieva EF/SA, 78 Mustang II U/SA (work in progress) #354 stock |
|
|
|
|
06-07-2011, 06:16 PM
|
#7 | |
|
Member
Join Date: Oct 2008
Posts: 168
Likes: 0
Liked 1 Time in 1 Post
|
Quote:
Not all of them are though, some were just very good and some were not. IMO, all this work needs to be done to the blocks regardless which casting number |
|
|
|
|
|
06-07-2011, 06:24 PM
|
#8 | |
|
Member
Join Date: Oct 2008
Posts: 168
Likes: 0
Liked 1 Time in 1 Post
|
Quote:
1980 Camaro @ 2,850 pounds race weight Powerglide with 5,200rpm stall 12 bolt with 4.88 gears and Mickey Thompson 32x14 Tires Engine, GM 509 Block, 4 bolt main (weaker 400) with GM main bolts - GM block, filled with Hardblok, all mods as suggested below - GM Nodular Iron Crank - King Bearings set @ our clearances - Flat Top Forged Pistons @ .0075" Clearance - 1/16" 1/16" 3/16" rings - Our final gone finish we do - GM 291 Camel Hump Heads, 2.02"/1.6" valves installed, bowl ported due to larger valves, exhaust runners ported to smooth out, chambers are not ported, intake runners are not ported - Crane Solid Cam 292/300 @.020" 256/264 @.050" .545"/.563" 105° lobe center installed at 102° - 1.46" Crane Springs 160 seat and 400 open - Victor Jr. - 1000 Annular Modified by us In the Camaro it ran 10.teens @ 131-133mph every pass. Some videos below. When he decided to part out on his own, he took the engine and put it in the Dragster @ 1,750 pounds race weight for some 8.60/8.70 consistent ET's Here are the videos,,, Pass 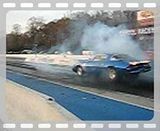 Cold Start  Running Clean 
|
|
|
|
|
 |
|
|


 Linear Mode

